
<animal.html>
<!DOCTYPE html>
<html lang="en">
 <head>
  <meta charset="UTF-8">
  <title>Document</title>
  <script src="../jquery-3.6.0.min.js"></script>
  <script>
  	$(function(){
		$(".cat").css("background","pink");
		$("#dog").css("background","yellowgreen");
		});
  </script>
 </head>
 <body>
	<ul>
		<li>fox</li>
		<li class="cat">cat</li>
		<li>fish</li>
		<li id="dog">dog</li>
		<li>bird</li>
	</ul>
 </body>
</html>
  	$(function(){
		$(".cat").css("background","pink");
		$("#dog").css("background","yellowgreen");
		});
html+css과 비슷한 점이 이런 점이다.
아이디 선택자 : id로 설정한 것은 #로 받아준다.
클래스 선택자 : class로 설정한 것은 온점(.)으로 받아준다.
가운데의 온점(.)을 기준으로 왼쪽 $달러 부분은 가져올 부분이고, 오른쪽 css로 시작하는 부분은 속성값을 주는 부분이다. class. cat을 갖고 와서 배경색 핑크를 해주고, id dog를 갖고 와서 배경색 옐로우그린을 해줘라. 라는 뜻이라고 보면 된다.
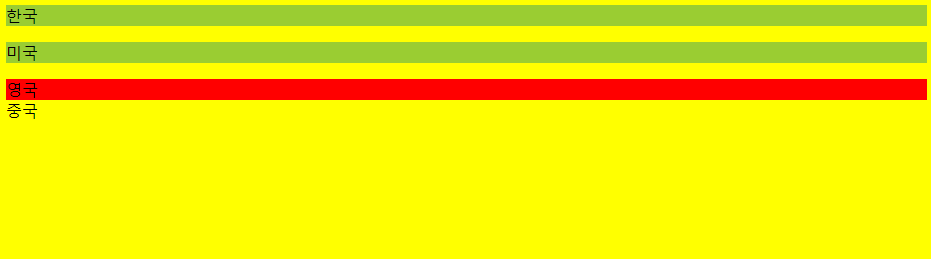
<country.html>
<!DOCTYPE html>
<html lang="en">
 <head>
  <meta charset="UTF-8">
  <title>Document</title>
  <script src="../jquery-3.6.0.min.js"></script>
  <script>
	$(function(){
		$("body").css("background","yellow");
		$("div#hong").css("background","red");
		$("#hong.foo").css("background","yellowgreen");
	});
  </script>
 </head>
 <body>
  <div id="hong" class="foo">한국</div>
  <p id="hong" class="foo">미국</p>
  <div id="hong" class="bar">영국</div>
  <div id="moo" class="foo">중국</div>
 </body>
</html>
$(function(){
$("body").css("background","yellow");
$("div#hong").css("background","red");
$("#hong.foo").css("background","yellowgreen");
});요소명(Tag Name) 선택자
$("body").css("background","yellow");
지정한 요소명(body)과 일치하는 요소 모두를 선택해 효과를 준다.
$("div#hong").css("background","red");
div#hong div 중에서도 hong만 선택해 효과를 준다.
$("#hong.foo").css("background","yellowgreen");
#hong.foo 아이디 hong중에서도 .클래스 foo만 선택
같은 곳에 여러 번 효과를 주었어도 마지막에 준 효과가 나타나니까 한국과 미국은 빨간색이 아니라 옐로우그린 색상이 되었다.

<hong2.html>
<!DOCTYPE html>
<html lang="en">
 <head>
  <meta charset="UTF-8">
  <title>Document</title>
  <script src="../jquery-3.6.0.min.js"></script>
  <script>
	$(function(){
		$("body").css("background","yellow");
		$("div p").css("background","yellowgreen");
	});
  </script>
 </head>
 <body>
  <div id="d1">
  	<div id="d2">
	 <div id="d3">
	 <p id="p1">hong</p>
		<div id="d4">
			<div id="d77">hong</div>
		</div>
		<p id="p2">hong</p>
	  </div>
	 </div>
	</div>

	<div id="d1">
		<div>
		</div>
	</div>
 </body>
</html>
$("div p").css("background","yellowgreen");
하위 요소 선택자 div 안에 있는 p 모두를 선택한 것이다.

<dog.html>
<!DOCTYPE html>
<html lang="en">
 <head>
  <meta charset="UTF-8">
  <title>Document</title>
  <script src="../jquery-3.6.0.min.js"></script>
  <script>
	$(function(){
		var student = $("#student"); //스튜던트를 갖고와
		var age = student.find(".age"); //스튜던트에서 찾아와
		var img = student.find("img");
		age.css("background","pink");
		img.css("border","3px solid red");
	});
  </script>
 </head>
 <body>
  <div id="student">
	<div class="age">17</div>
	<div class="photo">
	<img src="../img/dog.jpg" alt="강아지">
	<!-- alt 그림이 안 나왔을 때 대신 쓰려고-->
	</div>
  </div>
 </body>
</html>
당연히 변수 설정을 할 수 있다.
var student = $("#student");
변수 student에 div id를 넣어 갖고 온다.
var age = student.find(".age");
age 라는 이름에 나이를 넣어준다.
var img = student.find("img");
img 라는 이름에 이미지를 넣어준다.
위에서 변수에 정보를 넣어주는 과정은 아래처럼 쉽게 불러오기 위해서이다.
age.css("background","pink");
age에 핑크 배경색을 넣어라
img.css("border","3px solid red");
이미지에 3px 빨간색 실선을 넣어라
지금은 이름이 짧아서 쉽게 넣을 수 있지만 이런 기능도 있다~

<img src="../img/dog.jpg" alt="강아지">
여기서 alt는 사진이 뜨지 않았을 때 설명을 써주는 속성이다.

<div.html>
<!DOCTYPE html>
<html lang="en">
 <head>
  <meta charset="UTF-8">
  <title>Document</title>
  <script src="../jquery-3.6.0.min.js"></script>
  <script>
	$(function(){
		$('#div1').css('border','3px solid red');
		$('#div2').css('background','pink');
		$('#div3').css('opacity', 0.5);
	});
  </script>
 </head>
 <body>
	<div id="div1">div1</div>
	<div id="div2">div2</div>
	<div id="div3">div3</div>
 </body>
</html>
$('#div3').css('opacity', 0.5);투명도 50%로 조정하기 1은 불투명이다.

<div2.html>
<!DOCTYPE html>
<html lang="en">
 <head>
  <meta charset="UTF-8">
  <title>Document</title>
  <script src="../jquery-3.6.0.min.js"></script>
  <script>
	$(function(){
		$('#somediv').css({
				color:'red',
				display: 'block',
				background:'yellow',
				width: 200,
				height: 50,
				});
	});
  </script>
 </head>
 <body>
  <div id="somediv">
	<p>색상 구별하기</p>
  </div>
 </body>
</html>
		$('#somediv').css({ color:'red', display: 'block',
        		background:'yellow', width: 200, height: 50,
			});
중괄호{} 안에 css 효과를 쉽게 줄 수 있다.

<!DOCTYPE html>
<html lang="en">
 <head>
  <meta charset="UTF-8">
  <title>Document</title>
  <script src="../jquery-3.6.0.min.js"></script>
  <style>
	.container{height:120px;}
	#div1{ background:pink; display:block;}
	#div2{ background:yellow; display:block;}
  </style>
  <script>
			//빈공간
  </script>
 </head>
 <body>
 <div class="container">
	<div id="div1">FaidIn Example.</div>
  </div>
  <div class="container">
	<div id="div2">Faidout Example.</div>
  </div>
 </body>
</html>
우선은 body와 css 부분만 꾸몄을 때..
<!DOCTYPE html>
<html lang="en">
 <head>
  <meta charset="UTF-8">
  <title>Document</title>
  <script src="../jquery-3.6.0.min.js"></script>
  <style>
	.container{height:120px;}
	#div1{ background:pink; display:none;}
	#div2{ background:yellow; display:block;}
  </style>
  <script>
	$(function(){
		$('#div1').fadeIn(1000);
		$('#div2').fadeOut('slow');
	});
  </script>
 </head>
 <body>
 <div class="container">
	<div id="div1">FaidIn Example.</div>
  </div>
  <div class="container">
	<div id="div2">Faidout Example.</div>
  </div>
 </body>
</html>
#div1{ background:pink; display:none; }
display를 none으로 바꿔주면서 보이지 않게 해줬다.
그러나..
스크립트 부분에서 div1은 페이드인으로 서서히 드러나고, div2는 페이드 아웃으로 서서히 없어지게 만들었다. 여기서 1000은 1초 라는 뜻!

화살표 방향으로 서서히 움직이는 박스
<!DOCTYPE html>
<html lang="en">
 <head>
  <meta charset="UTF-8">
  <title>Document</title>
  <script src="../jquery-3.6.0.min.js"></script>
  <style>
	.container{height:120px;}
	#div1{ background:pink;
			position:absolute;
			top:0;
			margin:0;
			padding:50px;
		}
  </style>
  <script>
	$(function(){
		$('#div1').animate({
					top:200,
					left: 400}, 2000); //초
	});
  </script>
 </head>
 <body>
 <div class="container">
	<div id="div1">BOX</div>
  </div>
 </body>
</html>
div1 배경색 핑크, 포지션(위치), top 0(y좌표), margin 0상자의 바깥 위치, padding 상자의 크기 50px ... 이런식으로 초기값을 설정해주고 animate({ }); 안에 top 200(y좌표) left 400(x좌표) 속도 2초(2000) 설정을 하면!! 움직이는 것이다.
<!DOCTYPE html>
<html lang="en">
 <head>
  <meta charset="UTF-8">
  <title>Document</title>
  <script src="../jquery-3.6.0.min.js"></script>
  <style>
	.container{height:120px;}
	#div1{ background:pink;
			position:absolute;
			top:0;
			margin:0;
			padding:50px;
		}
  </style>
  <script>
	$(function(){
		$('#div1').animate({ top:0, left: 400 }, 2000,
    function(){$(this).animate({top:200, left:400}, 1000)});
	}); //움직이기
  </script>
 </head>
 <body>
	<div id="div1">
		<img src="../img/dog.jpg" width="100" height="100">
	</div>
 </body>
</html>
마찬가지로 초기값 왼쪽 위쪽부터 시작하여 #div1이 left(x값)으로 400 만큼 2초 동안 움직인다. 그 밑으로 내리기 위해서 top(y값)을 200으로 내려주었다.

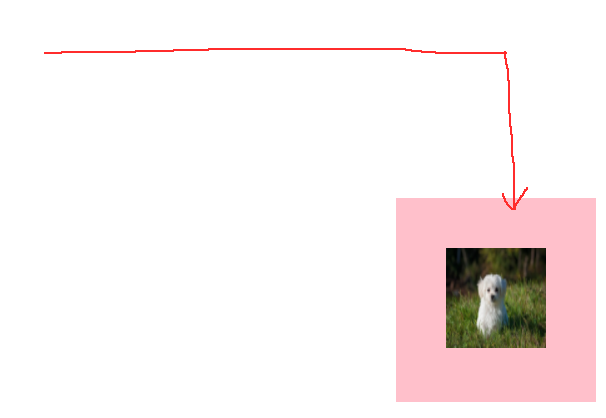
<!DOCTYPE html>
<html lang="en">
 <head>
  <meta charset="UTF-8">
  <title>Document</title>
  <script src="../jquery-3.6.0.min.js"></script>
  <style>
	.container{height:120px;}
	#div1{ background:pink;
			position:absolute;
			top:0;
			margin:0;
			padding:50px;
		} /* start */
  </style>
  <script>
	$(function(){
		$('#div1').animate({
			top: 0,
			left: 400
			}, 1000,
			);
		$('#div1').animate({
			top: 200,
			left: 400
			}, 1000,
			);
		$('#div1').animate({
			top: 200,
			left: 0
			}, 1000,
			);
		$('#div1').animate({
			top: 0,
			left: 0
			}, 1000,
			);
	});
  </script>
 </head>
 <body>
	<div id="div1">
		<img src="../img/dog.jpg" width="100" height="100">
	</div>
 </body>
</html>
4번 움직이기 위해서 네번의 실행문을 만들어주었다. left(x값) top(y값)만 잘 지정하면 쉽게 사진을 움직일 수 있다.
<!DOCTYPE html>
<html lang="en">
 <head>
  <meta charset="UTF-8">
  <title>Document</title>
  <script src="../jquery-3.6.0.min.js"></script>
  <style>
	#div1{ background: pink;
		   position: absolute;
		   top:0; left:0; padding: 5px;
		  }
  </style>
  <script>
	$(function(){
		$('#div1').animate({ top:0, left:400 }, 1000,
		function(){$(this).animate({top:200, left: 400}, 1000,
		function(){$(this).animate({top:200, left: 0}, 1000,
		function(){$(this).animate({top:0, left: 0}, 1000)}
		)})
		}
		);
	});
  </script>
 </head>
 <body>
	<div id="div1">
		<img src="../img/dog.jpg" width="150px" height="100px">
	</div>
 </body>
</html>
같은 방식으로 움직이지만 한 줄 안에 욱여넣은 모습. 많이 어렵다. 이런 방법도 있다는 걸 알고 넘어가는 게 좋다.
'개발일지 > JavaScript + jquery' 카테고리의 다른 글
| [jquery ] addClass(),removeClass() 명령어 (1) | 2021.09.13 |
|---|---|
| [jquery] 기본 명령어 예제 몇 가지 ② (0) | 2021.09.13 |
| [jquery] 다운로드 주의 사항 + 기본 사용법 (0) | 2021.09.10 |
| [js] canvas에 그림 그리기(선, 사각형, 삼각형, 글씨 등) (1) | 2021.09.10 |
| [js] 새 창 열기 & 연 창을 닫기 & 새 창에서 인쇄 (window 객체 사용) (0) | 2021.09.09 |


